 Device Rule
An
 Device Rule, is a collection of checks that can be done on the device.
These checks can flag the device in the following situations:
 Critical - a check that if not checked, prevents the device from working, something like negative slope in a pipe
 Warning - a check that needs to be considered, but does not prevent the device from working.
The covering of a pipe in the final stretch, when it is reaching the mouth of the culvert, in general, it does not satisfy the minimum cover.
But constructively that's what happens, so you can
ignore the warning, after it has been studied
Checks can be made regarding the hydraulic Designing:
- Draw velocity must be within a range: 1.0 m/s ≥ Speed ≥ 5.0 m/s
Note: this is an example.
Check with the regulatory body (city hall, etc)
- The flow depth must be less than 80%
You can check the geometric conditions of the tube:
- The pipe needs to be connected to a structure, such as a PV
- The excavated trench needs to be larger than the outer width of the pipe
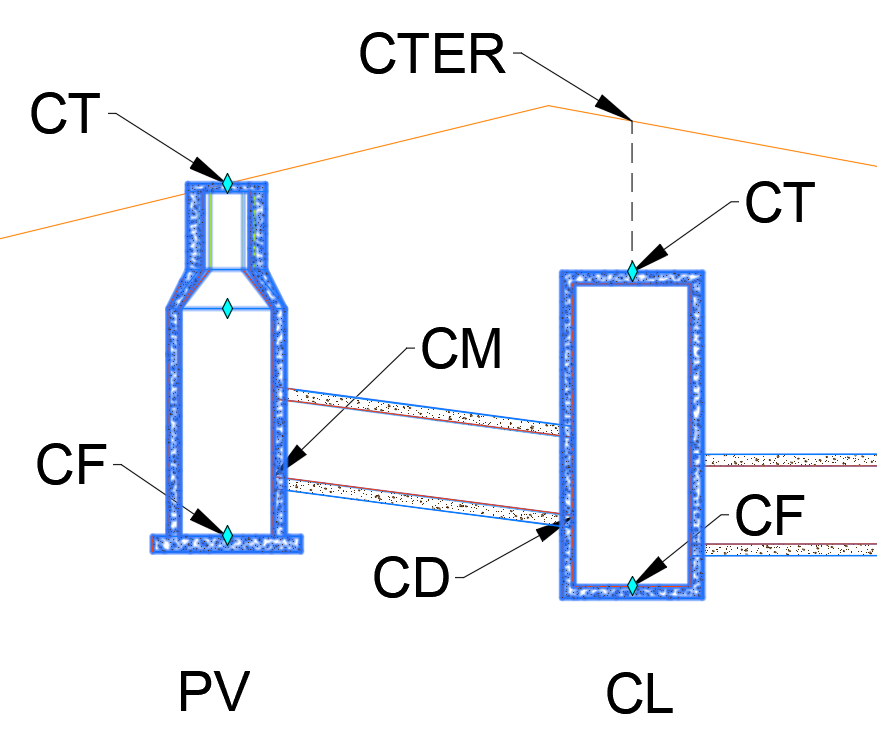
- The step (Step = CD - CFdownstream) in relation to the bottom of the downstream PV must not be greater than 1.5 m
- The overhang (Rebound = CM - CFamount) must not exceed 30 cm
Rules also allow you to check whether they have been set:
- Alignment
- Profile
- Surface
- Etc....
That said, it is convenient to check which properties must be validated.
To create a new rule, go to the Rules node and right-click, then click Create:
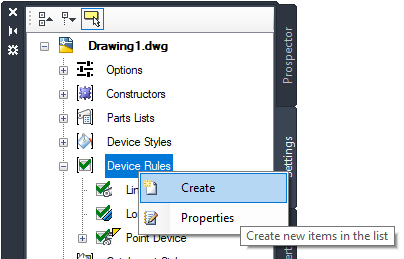
You can also use the command SRULES to create the rule.
As stated at the beginning, a rule is a collection of checks.
So when creating a check, give it a suitable name:
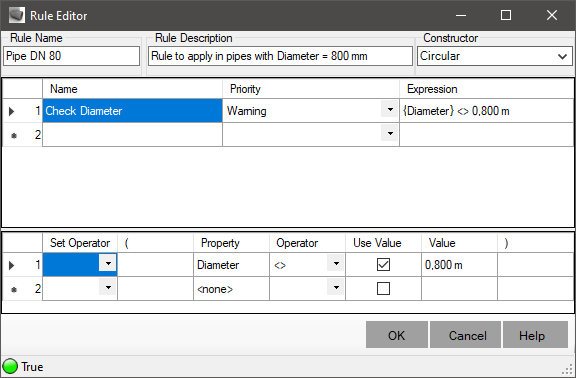
In the expression above, the expression named "Diameter" checks that the pipe in question has the correct diameter.
This would show a warning in the Designing worksheet if Nodes arbitrate this rule to a pipe whose diameter is not 800 mm:

In the Designing worksheet, if the rule checking field ( ) is enabled, you will see the expression(s) that signal a problem:
 expression evaluates to FALSE
 expression evaluates to TRUE and priority set to WARNING
 expression evaluates to TRUE and priority set to CRITICAL
Still in the spreadsheet, in the row headers, you will see next to the device icon, the highest priority indication that appears in the tube

To build an expression, after having named it in the upper frame, in the lower frame, build the expression to be evaluated, filling in the columns:
- Concatenator - serves to "nest" expressions, using the NOT, AND and OR operators
- ( - whether or not to insert an opening parenthesis
- Property - inserts a property to the expression builder.
Note, only the properties of the device type selected in the Applies To field will be listed in this column
- Operator - inserts a logical operator:
| Operator
|
Name
|
| >
|
Bigger than
|
| <
|
Less than
|
| ≥
|
Greater or equal
|
| ≤
|
Less than or equal to
|
| <>
|
Different from
|
| =
|
Same as
|
| LIKE
|
Similar to
|
- Use Value - enables Value column for editing
- Value - an arbitrary, user-defined value.
It will depend on the type of property chosen in the Property column and whether it is enabled to use a value
in the Use Value
column
- ) - whether or not to insert a closing parenthesis
Note that an expression can have more than one line in the expression builder.
For example:
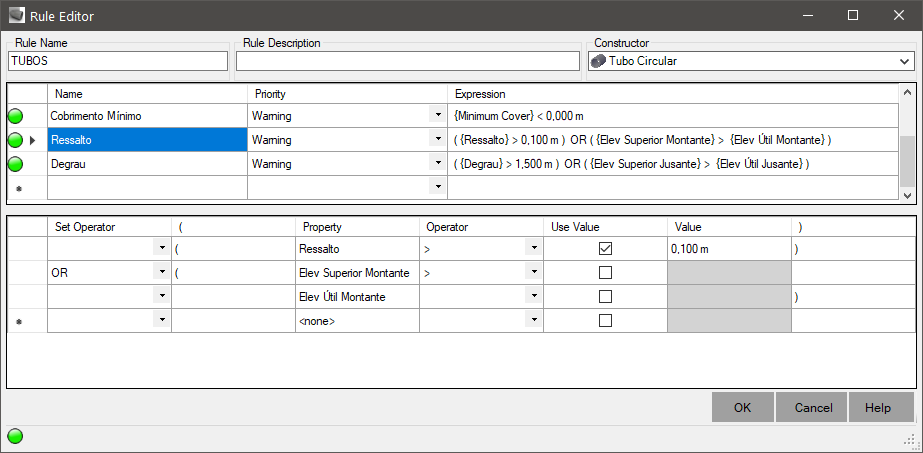
As you add elements to the expression builder, it shows a message in the footer of the builder, which is the result of the expression you are editing.
So, if an error occurs, it will be reported:
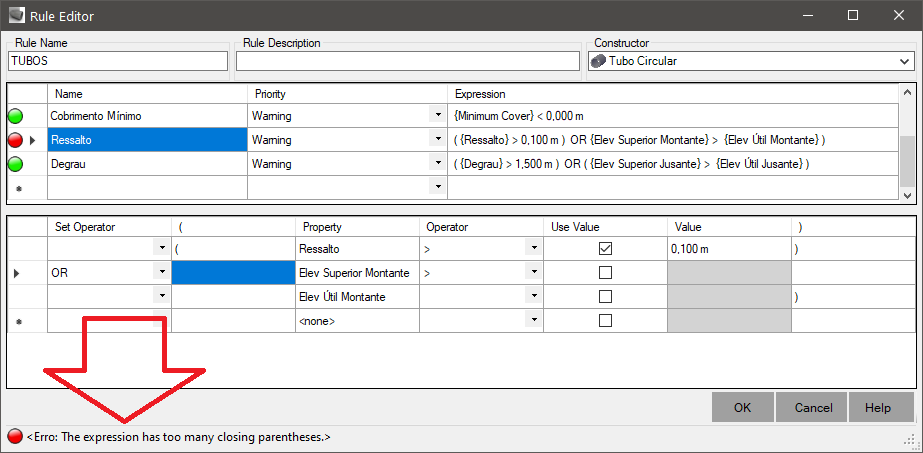
Note, if the expression cannot be evaluated and generates an error, the worksheet will report this error.
An expression is only valid if it evaluates to:
Any other result is considered as an error in the expression syntax.
What checks to do?
- Pipes - in addition to the checks that the program already does:
- Surface - for calculating excavation, reading elevations, cover
You can add following rules:
- Slope - networks that work by gravity, cannot have slope less than or equal to zero
- Resistance - distance between the dimension of the lower internal generatrix of the upstream and the bottom dimension of the tube's upstream structure
In general, it is not usual to have a frame boss for the outlet pipe.
But it may be that a small value, something like 20 centimeters, is acceptable
- Step - distance between the elevation of the lower downstream internal generatrix and the bottom elevation of the downstream structure of the pipe
This is a check that depends more on the structure than on the tube, so you should check the maximum step on the structure
In the case of the minimum step, yes, you must configure it so that the program signals a negative step, which indicates that the pipe is buried in
relation to the structure
- Maximum Speed - for drainage networks, may cause tube wear.
In general, the speed is limited to 5 m/s
- Minimum Speed - In general, the speed must be greater than 1 m/s, to avoid sedimentation
- Tractive Tension - To avoid sedimentation, in general 1 Pa
- Maximum Coverage - the structured project The nature of the pipe provides for a maximum embankment height above it
- Minimum Coverage - the structural design of the tube provides for a maximum load, which dissipates in the embankment above the tube
- Draw depth - for free conduits, a maximum value of 80% is considered
- Structures - in addition to the checks the program already does:
- Surface Elevation - Indicates if you have surface and if you can read the elevation
- Superelevation - in case of informing NaN values
You can add following rules:
- Largest tube - signals if there is a very large tube connected to the structure
- Connections - sewage cleaning terminal must only have one pipe connected, manholes can only have one inlet or one outlet
- Step - make sure the highest tube step will not cause wear on the frame
- Pipe elevations - signaling if the tube is inside the manhole body
These are some suggestions and you are free to add them or not
![]() Device Rule, is a collection of checks that can be done on the device.
These checks can flag the device in the following situations:
Device Rule, is a collection of checks that can be done on the device.
These checks can flag the device in the following situations:


![]() ) is enabled, you will see the expression(s) that signal a problem:
) is enabled, you will see the expression(s) that signal a problem:


